Tokyo’s neon-lit streets have become an icon of modern urban photography — glowing signs, reflective puddles, and speeding cars all creating a cinematic visual language. With Google Gemini Nano Banana, you can now generate stunning Tokyo street car portraits that blend technology, art, and atmosphere — no expensive cameras or night shoots required.
This guide walks you through how to create, enhance, and animate a Tokyo-inspired street car portrait using Gemini and other powerful AI tools.
Understanding Tokyo Street Car Portraits
Tokyo street car portraits capture the energy and rhythm of the city. These artworks often feature:
- Bright neon lights and Japanese signage reflecting on wet streets.
- Cars or bikes with cinematic motion or parked stylishly in frame.
- Urban composition with buildings, crosswalks, and night rain ambiance.
- Moody color palette — deep blues, pinks, purples, and reflections.
Traditionally, photographers rely on expensive lenses, long exposures, and city access. But with Gemini’s AI image generation, you can produce the same results from a simple text prompt.
What is Google Gemini Nano Banana?
Google Gemini is Google’s latest multimodal AI that understands text, images, and complex visual prompts.
- Gemini Nano: Lightweight version for mobile and local generation.
- Banana: The internal codename for fast, efficient visual generation.
You can use it at gemini.google.com or via Google ImageFX (labs.google/imagefx), both powered by Imagen 3 — Google’s top-tier photorealistic image model.
Gemini understands your prompt naturally. Just describe your “Tokyo street car scene,” and it generates photorealistic images matching your description in seconds.
Step 1: Creating Your Tokyo Street Car Portrait
Access Gemini Platform
- Visit gemini.google.com and log in.
- Choose “Create Image” or open ImageFX for detailed visual generation.
Write a Clear Prompt
Gemini responds best to descriptive prompts. Include environment, lighting, subject, and mood.
Example prompt:
“Photorealistic portrait of a sleek sports car parked on a rainy Tokyo street at night, neon signs reflecting on wet asphalt, cinematic lighting, Japanese kanji signs in background, high detail, cyberpunk color tones.”
Gemini will generate 2–4 variations — choose your favorite or refine it further.
Pro Tips for Prompts
To get the best results, mention:
- Weather: rainy night, misty, drizzle reflections.
- Lighting: neon glow, cinematic light, reflections.
- Car details: model type, color, style (classic, futuristic, JDM).
- Composition: front angle, low shot, bokeh lights behind.
Example upgrade:
“Cinematic close-up of a red Nissan Skyline under neon pink lights, reflections on car hood, Shibuya street background, moody atmosphere, photorealistic, 8K detail.”
Step 2: Enhancing the Generated Portrait
Once Gemini gives you your base image, it’s time to enhance quality and details with AI tools.
1. Topaz Photo AI – Sharpen & Enhance
Topaz Photo AI enhances clarity, removes blur, and boosts micro-details.
- Sharpen car body and headlights.
- Highlight reflections on wet surfaces.
- Enhance chrome and metallic texture.
- Increase resolution (2x–4x upscale).
Your car will look more real — with crisp details and studio-like polish.
2. Magnific AI – Add Realistic Texture
Magnific AI intelligently adds natural textures when upscaling.
- Enhances raindrops and glass reflections.
- Improves neon glow and sign clarity.
- Adds realistic street surface details.
Set Creativity between 0.4–0.6 for authentic cinematic looks without over-editing.
3. Luminar Neo – Adjust Mood and Lighting
Luminar Neo’s AI tools help you fine-tune the atmosphere.
- Use Relight AI to make neon lights pop.
- Atmosphere AI adds subtle haze or fog.
- Color Harmony for blending neon pinks, purples, and blues.
Try a “Rainy Night” filter and increase contrast slightly — it’ll give that moody Tokyo vibe instantly.
4. Adobe Firefly – Extend or Modify the Scene
Need to add more street detail or expand the frame?
Adobe Firefly’s Generative Fill is perfect:
- Extend background buildings.
- Add Japanese kanji signboards.
- Replace sky reflections or add light trails.
Firefly maintains lighting consistency, so your added areas feel natural.
Step 3: Turning Your Portrait into a Cinematic Video
A static Tokyo street car portrait looks great, but a short AI video adds motion and realism.
1. Runway ML (Gen-2) – Animate the Scene
Upload your enhanced image to Runway ML. Then, type a motion prompt like:
“Slow camera pan across the car, neon reflections moving, rain softly falling.”
Runway will generate a 4–6 second cinematic video, complete with realistic camera movement and animated reflections.
2. Pika Labs – Add Cinematic Effects
Want a creative twist?
Use Pika Labs to add:
- Light rain and flickering neon lights.
- Lens flare from street lamps.
- Subtle car reflections moving across wet asphalt.
Prompt example:
“Add rain animation, glowing neon lights reflecting on car surface, cinematic cyberpunk Tokyo vibe.”
Pika excels at stylized animation — perfect for Instagram or reels.
3. D-ID – Create a Talking Driver (Optional)
If your scene includes a visible driver, D-ID can animate them.
You can create a talking character video saying lines like:
“Welcome to Tokyo nights.”
Choose realistic voice tone and slight head movement for a natural, cool effect.
Step 4: Advanced Enhancements
Maintain Visual Consistency
If you plan to make a series (like different cars or angles in the same Tokyo setting):
- Use Leonardo.ai to maintain consistent lighting and style.
- Or use Artbreeder to tweak one image’s composition while keeping color tone and reflections identical.
Color Grading Like a Pro
For that premium cinematic finish:
- Use DaVinci Resolve to apply rich blue-pink cyberpunk color grades.
- Slight vignette around edges focuses viewer attention on the car.
- Use Palette FM to mimic movie-grade color styles like Blade Runner or Ghost in the Shell.
Example Prompts for Tokyo Street Car Portraits
1. Classic JDM Scene
“Red Toyota Supra parked in Shinjuku alley at night, rain puddles reflecting neon signs, cinematic lighting, detailed wet asphalt, vapor rising, photorealistic 8K.”
2. Futuristic Cyberpunk Car
“Futuristic electric sports car on Tokyo street under glowing billboards, foggy night atmosphere, blue-pink neon reflections, science fiction aesthetic, high detail.”
3. Street Drift Motion
“Cinematic action shot of drifting Nissan GTR in rainy Tokyo street, glowing reflections, motion blur, light trails, dynamic camera angle, hyperrealistic.”
4. Minimal Editorial Style
“Black luxury sedan under single neon light, minimal background, wet street reflection, dark cinematic tone, moody composition.”
5. Retro 1980s Vibe
“Vintage 1980s Japanese car on Shibuya crossing, neon pink-blue glow, VHS texture, film grain aesthetic, nostalgic mood.”
Best Practices for AI Tokyo Portraits
- Be specific with color and atmosphere — Tokyo = neon, rain, reflections.
- Refine gradually — first generate a clean base, then enhance.
- Add realism step by step — Gemini → Topaz → Magnific → Luminar → Runway.
- Experiment with camera angles — low shots and reflections look cinematic.
- Keep human elements subtle — too much motion can break realism.
Prompt Detail
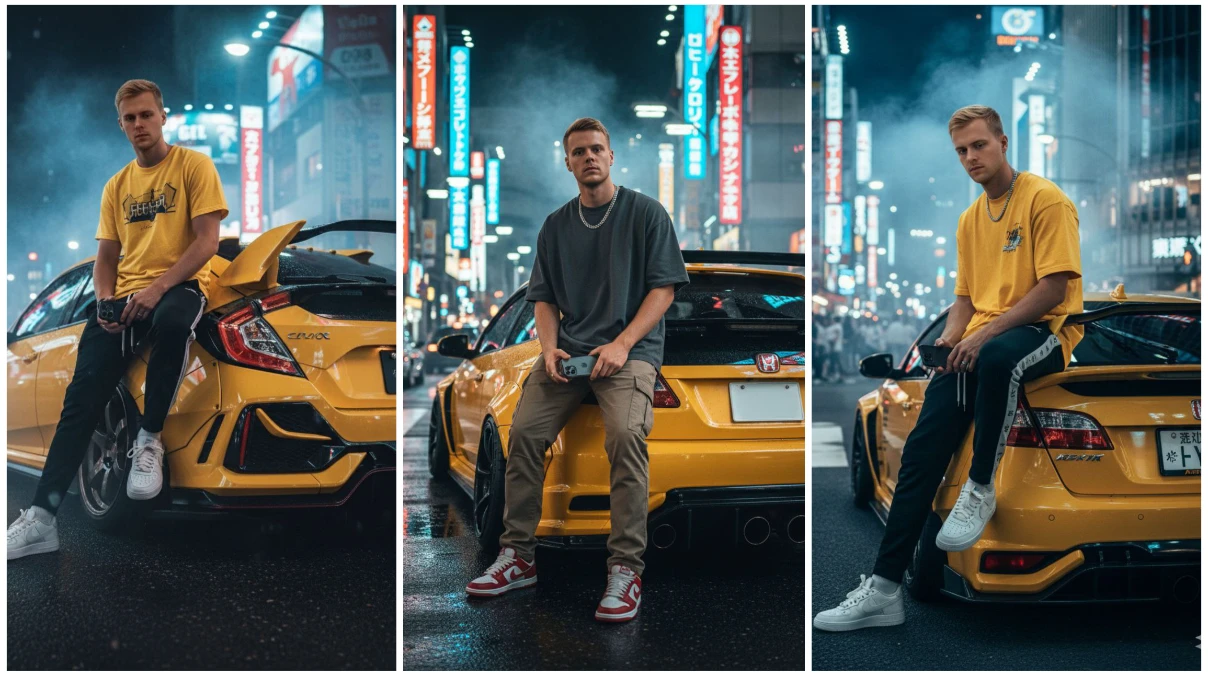
Ultra-realistic cinematic portrait of a young man sitting on the rear wing of a Yellow Honda civic type R with widebody kit,in the busy streets of Tokyo Japan.The man is wearing a yellow Shirt,jogging pants, airforce 1 off white.He holds a iphone 17 pro max confidently in one hand.The atmosphere is filled with dramatic cinematic lighting,moody smoke,and strong shadows.Replace the face of the man with the uploaded photo. Ensure identity preservation of the new face with seamless.
Conclusion
Creating a Tokyo Street Car Portrait using Google Gemini Nano Banana is a creative journey that blends modern AI with cinematic art. From text prompts to final video, the entire process is accessible, fast, and visually powerful.
By combining Gemini’s photorealistic generation with enhancement tools like Topaz Photo AI, Magnific AI, Luminar Neo, and Runway ML, you can produce high-end visuals ready for social media, wallpapers, or digital art showcases.
Start small, refine your prompt, and experiment with lighting and effects — soon you’ll have breathtaking Tokyo night portraits that look straight out of a cyberpunk film.